Allplan API "Hello World!" 메세지창 띄우기홍사훈 0건 1,721회 15-05-16 11:18 |
관련링크
본문
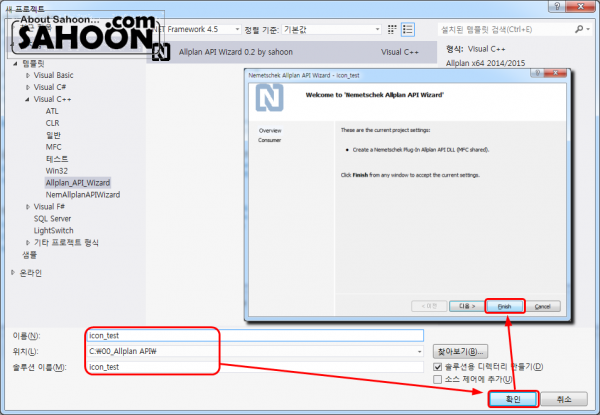
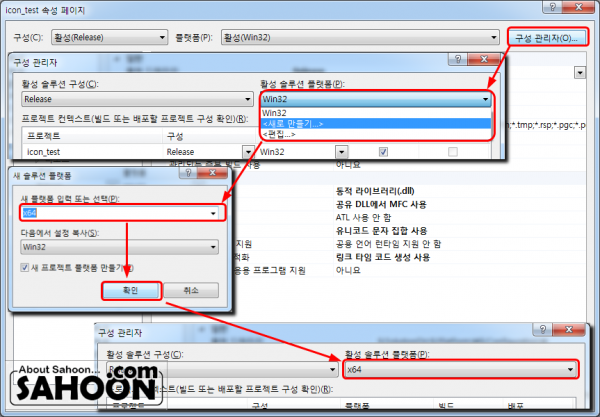
◆ 프로젝트 생성 기본작업.
1) 새 프로젝트를 생성합니다. (여기선 Hello_World로 입력합니다.)
2) x64플랫폼을 활성화 합니다.
3) 각 디렉토리를 확인합니다.
- C/C++ => 추가 포함 디렉터리
- 링커 => 추가 라이브러리 디렉터리
- 링커 - 입력 => 추가 종속성
◆ 코드 수정
1) 프로젝트명input.cpp (Hello_WorldInput.cpp) 파일을 열어, 굵게 표기된부분을 추가합니다.void Cicon_testInput::StartInputFunction(
int EventID //!< EventID
,AddMsgInfo * /*pMsgInfo*/ //!< Additional message info
)
{
AFX_MANAGE_STATE(AfxGetStaticModuleState());
//----------------- Create the input function
switch(EventID)
{
case 34000:
//SetInputFunction(new CComsumer());
//::AfxMessageBox(_T("Create new imput function here!"));
::AfxMessageBox(_T("Hello World!"));
ExitInputFunction();
break;
}
}
2) XML_Menu+프로젝트명.xml (XML_Menu_HelloWorld.xml) 파일을 열어, 내용을 확인합니다.<AlltopMenu>
<Item Name ="HelloWorld">
<Item
Name ="Custom Consumer"
Dll ="HelloWorld"
Event ="34000">
</Item>
</Item>
</AlltopMenu>
◆ 설치하기.
- Allplan 설치 폴더 (C:\Program Files\Nemetschek\Allplan\Prg) 안에 DLL파일을 복사합니다.
- Allplan 설치 폴더 (C:\Program Files\Nemetschek\Allplan\Menu) 안에 XML파일을 복사합니다.
Allplan을 재시작하면 메뉴에 "Plug-In"이 추가되고 그 하위메뉴로 추가한 DLL이 생성된걸 확인하실수 있습니다.
등록된 댓글이 없습니다.


